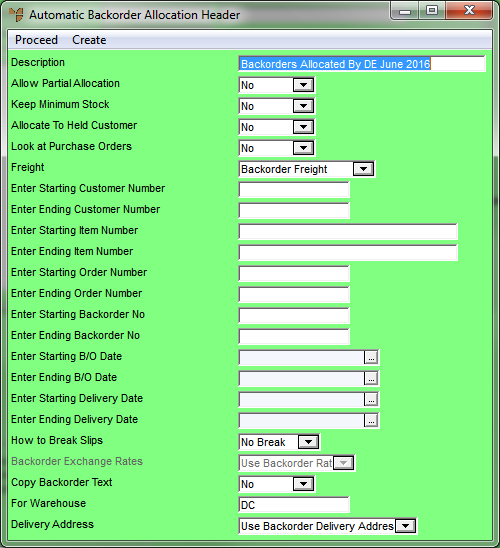
You use the Automatic Backorder Allocation Header screen to set limits on the automatic backorder allocations, such as specific debtors, items or dates.
Refer to "Creating a New Automatic Backorder Allocation Batch".
Refer to "Recalling an Automatic Backorder Allocation Batch".
Micronet displays the Automatic Backorder Allocation Header screen.

|
|
Field |
Value |
|
|
Description |
Micronet displays the batch description entered when the batch was created. |
|
|
Allow Partial Allocation |
Select Yes if you want to allow partial allocations of items to customer backorders, or No if you don't. If you select Yes, Micronet will allocate items even if the customer order can't be completely fulfilled, e.g. they have 10 items on backorder but you only have 7 available to ship. |
|
|
Keep Minimum Stock |
Select Yes if you want Micronet to maintain the minimum stock level on the shelf before allocating free stock to customer backorders. Select No if backorder allocations override minimum stock levels. |
|
|
Allocate to Held Customer |
Select No if you only want backorders allocated to customers whose accounts are not on hold. Select Yes if you want Micronet to allocate backorders for all customers, including those with an On Hold flag. |
|
|
Look at Purchase Orders |
Select Yes if you want Micronet to consider items on purchase orders that are due in from your suppliers, or No to ignore purchase orders. If you select Yes, Micronet checks the anticipated delivery dates and matches these to backorders that could potentially be delivered if those items came in on time. |
|
|
Freight |
Select an option for how you want freight calculated and applied to the goods. Options are:
|
|
|
Enter Starting / Ending Customer Number |
If you want to limit allocations to a particular customer range, enter the starting and ending customer numbers. You can also press spacebar then Enter to select customers. Leave these fields blank to include all customers. To allocate items for a single customer, enter the customer number in both fields. |
|
|
Enter Starting / Ending Item Number |
If you want to limit allocations to a particular item number range, enter the starting and item numbers. You can also press spacebar then Enter to select items. Leave these fields blank to include all item numbers. |
|
|
Enter Starting / Ending Order Number |
If you are allocating goods for a single customer, enter the starting and ending customer order numbers. Leave these fields blank to include all customer orders. |
|
|
Enter Starting / Ending Backorder No |
If you want to limit allocations to a particular backorder number range, enter the starting and backorder numbers. Leave these fields blank to include all backorders. |
|
|
Enter Starting / Ending B/O Date |
Enter or select the date range for the backorders you want to include in this batch. Leave these fields blank to include all dates. |
|
|
Enter Starting / Ending Delivery Date |
Enter or select the starting and ending delivery due dates for the backorders you want to include in this batch. Leave these fields blank to include all delivery dates. If you selected Yes in the Look at Purchase Orders field, Micronet uses these dates to limit the purchase orders it considers. |
|
|
How to Break Slips |
Select how you want picking slips grouped for printing. The options are:
|
|
|
Backorder Exchange Rates |
|
|
|
Copy Backorder Text |
Select Yes if you want Micronet to print any text entered onto your orders at order entry time to any subsequent customer invoices allocated in this batch. Otherwise, select No. |
|
|
For Warehouse |
Enter the warehouse you want items allocated to. You can also press spacebar then Enter to select a warehouse. The goods will only be allocated to backorders for that warehouse. |
|
|
Delivery Address |
Select the delivery address to use for the backorders – the backorder delivery address or the customer delivery address. |
Micronet scans your item and orders files for the details of items to be purchased. When it has finished, it redisplays the Automatic Backorder Allocation screen with all items matching your criteria. The items and quantities to be ordered are displayed on your screen for your verification and so you can make any changes required.
|
|
|
Technical Tip Alternatively, you can select select PROCEED or press F2 to redisplay the Automatic Backorder Allocation screen without updating the automatic backorder allocations. |
|
|
|
Technical Tip 2.8 Feature If the company setting Pick from one tile shade on the Invoicing Configuration screen is set to On Order Creation (refer to "Edit - Program - Invoicing"), Micronet will attempt to automatically allocate entire backorder quantities from one serial number / batch. You can see the quantity allocated in the Allocated field on the Automatic Backorder Allocation screen. If there is no serial number / batch with enough stock to satisfy an entire backorder quantity, there will be no automatic allocation for that line and the quantity Allocated will remain at zero. When you post the batch, if there is no longer enough stock to satisfy an entire backorder quantity (e.g. because another user has taken some or all of the allocated stock), that line will simply not be added to the invoice / picking slip. |